The Pack
Overview
The Pack turns one Tala WTE box, your Server (AP) acting as the pack leader, into the driver of many client boxes, the members. From a single screen you register members, push a network config to each one, start the traffic profile you want, sail past captive portals, and watch live status, all without ever logging into a member. It is how you stand up a believable room full of clients on a training network from one console.
When to use it. Reach for the Pack when one client box is not enough: you want several clients generating realistic traffic, a steady stream of captive-portal logins, or a fleet of WPA handshakes. Each member runs the same traffic engine as the Traffic Console, just driven centrally instead of box by box. If you only have one client box, or you want to drive it by hand, use Client Mode on that box directly instead.
How it talks to members. The leader reaches each member over the member's own self-signed HTTPS and authenticates with an agent key (no member login). On first contact it pins the member's certificate, so a later certificate swap is rejected as an impostor.
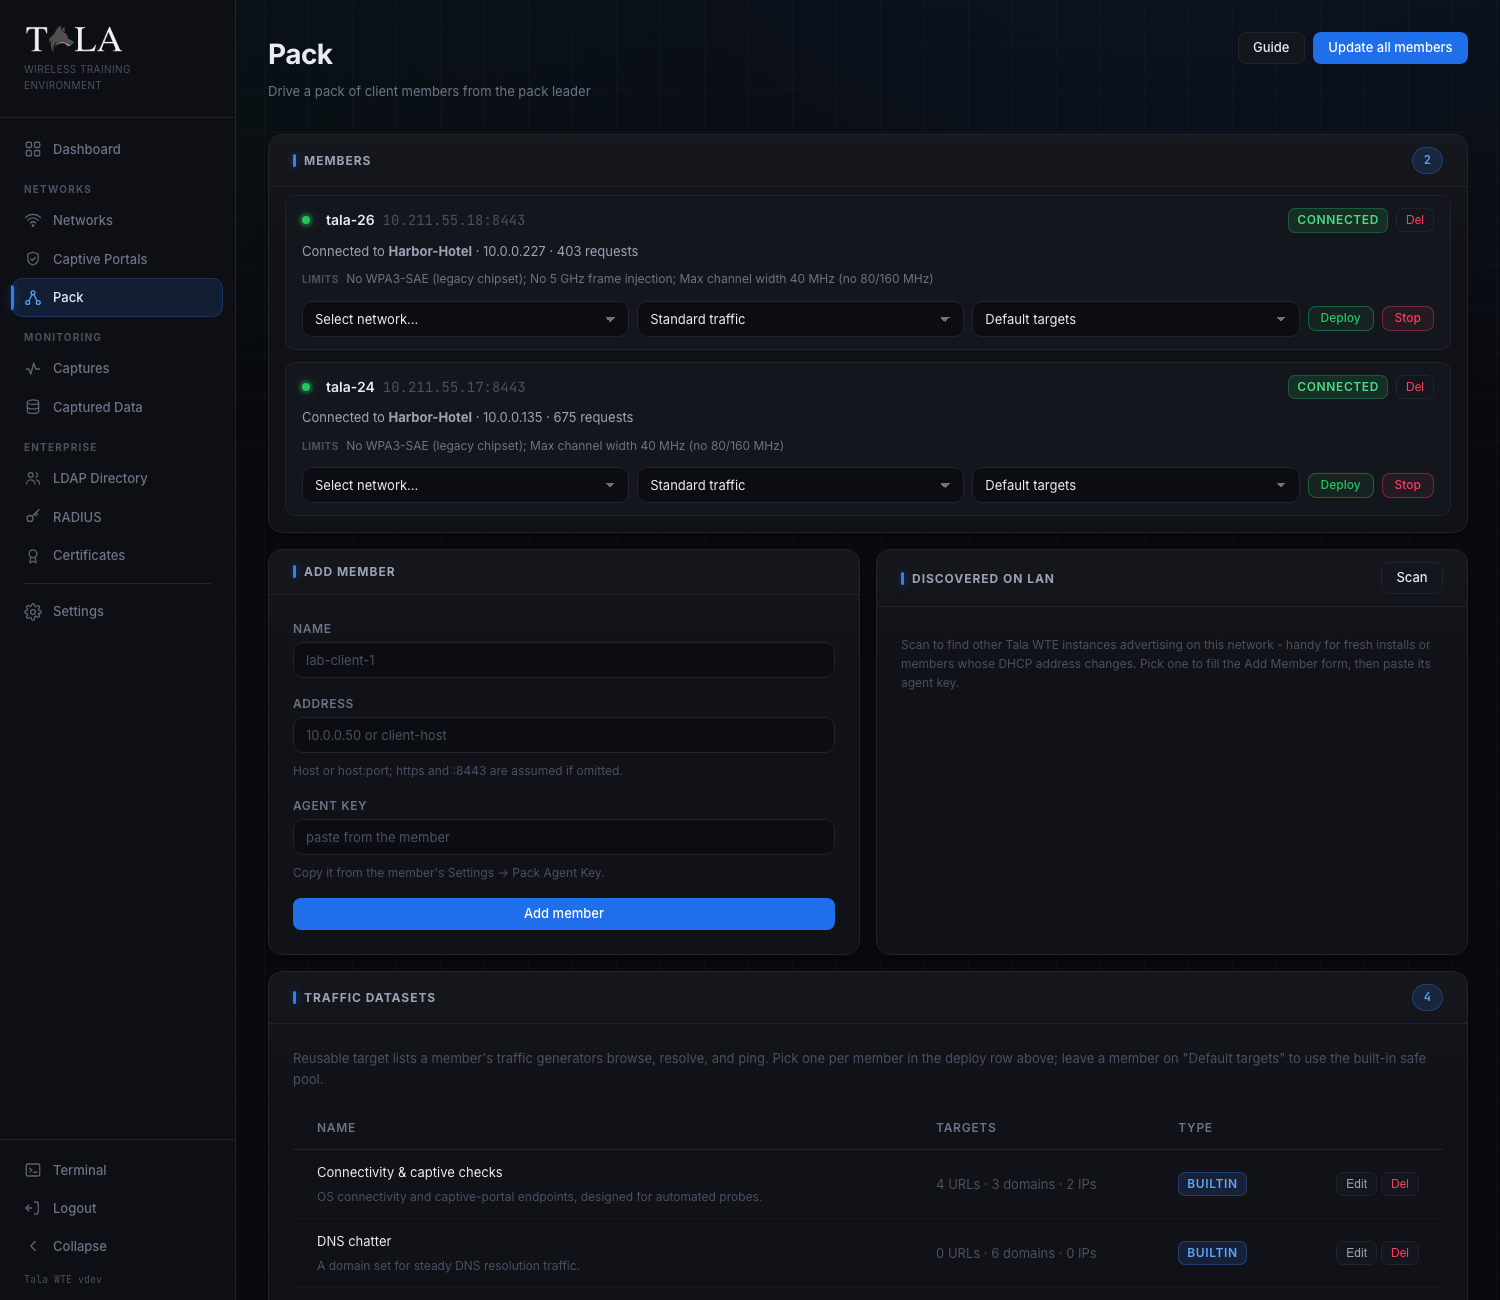
The page is one scrolling column:
- Members at the top, the live list with a per-member deploy row.
- Add Member and Discovered on LAN side by side.
- Traffic Datasets at the bottom, the reusable target lists.
- In the header, top right, a Guide button (opens the in-app help) and Update all members.
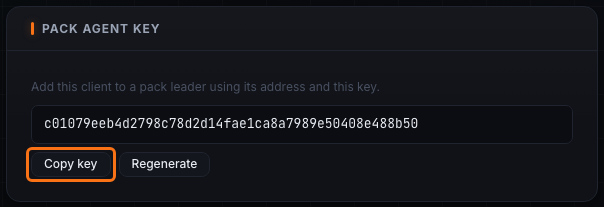
Step 1: Get the member's agent key
Every member authenticates the leader with an agent key instead of a username and password. You copy that key from the member and paste it into the leader.
On the member box, open Settings and find Pack Agent Key, then Copy key. The key is created automatically on first use, so it is always there to copy, there is nothing to generate first.
Judgment:
- Copy key is all you normally need. Paste it into the leader's Add Member form in the next step.
- Regenerate (on the member) rotates the key and instantly cuts off any leader still holding the old one. Use it if a key may have leaked, or to evict a leader. After regenerating you must re-add the member on every leader with the new key.
Keep the agent key secret. Anyone holding it can drive that member.
Step 2: Register a member
There are two ways to register a member, both in the panels below the Members list. Use Add Member when you already know the member's address; use Discovered on LAN when you do not.
Option A: Add Member form
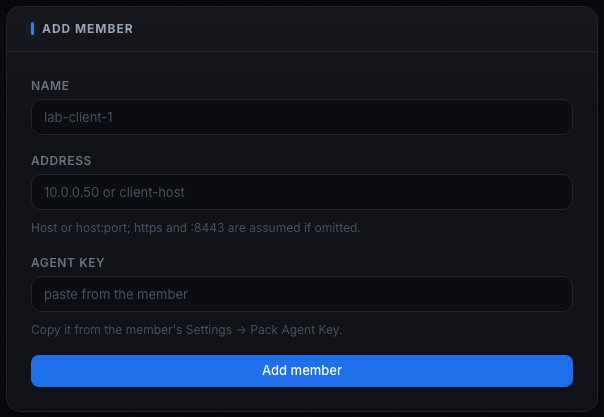
Fill all three fields, they are all required:
- Name - a label for the member, for example
lab-client-1. This is just for your eyes in the Members list. - Address - the member's
hostorhost:port, for example10.0.0.50orclient-host. The field hint reads: Host or host:port; https and :8443 are assumed if omitted. So you can type a bare IP and the leader fills inhttps://and:8443for you. Only include a port if the member listens on a non-default one. - Agent key - paste the key you copied in Step 1. The hint reads: Copy it from the member's Settings -> Pack Agent Key.
Click Add member (it reads Adding... while it works). On success you see a "Member added to the pack" toast and the member appears in the Members list. If any field is empty you get "Name, address, and agent key are all required"; if the leader cannot register it you get the error in a toast.
Option B: Discovered on LAN
Use this when you do not know a member's address up front, handy for fresh installs or members whose DHCP lease has changed.
SCREENSHOT NEEDED: The Discovered on LAN panel after a Scan, showing one or more discovered Tala WTE instances each with its name, address, role and version, and a Use button.
- In the Discovered on LAN panel, click Scan (it reads Scanning... while it works). The leader browses the LAN over mDNS for other Tala WTE instances.
- Each result lists the instance name, its address, and below that its role and version (for example
member - v1.0.0). The leader filters itself out of the list. - Click Use on a result. This fills the Add Member form's Name and Address for you and shows the toast "Filled the form - paste the member agent key, then Add member".
- Paste that member's Agent key (Step 1) into the now-filled form and click Add member.
If nothing is found you get "No other Tala WTE instances found on the LAN". Scan only finds instances on the same LAN that advertise over mDNS; a member on another subnet, or one with mDNS blocked, will not appear, register it with Option A instead.
Step 3: Read member status at a glance
Once registered, each member shows as a card in the Members list with a live status dot, a badge, and a one-line detail. The leader polls every member every 5 seconds, so the cards stay current on their own.
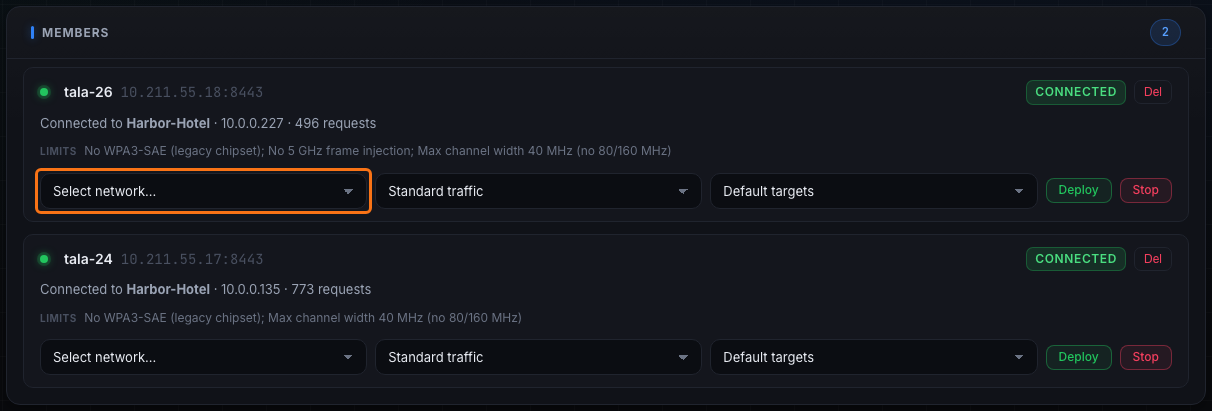
The top of each card shows:
- A status dot, green when the member is reachable and connected, dim otherwise.
- The member name and its address (greyed, monospace).
- A status badge on the right, plus a Del button.
The status badge tells you the member's real state:
| Badge | Color | Meaning |
|---|---|---|
| checking | neutral | Before the first status comes back. |
| connected | green | Associated to a network. |
| idle | neutral | Reachable but not connected. |
| no adapter | yellow | Reachable but reports zero wireless adapters. |
| unreachable | red | The leader cannot reach the member: wrong address, member down, or agent key rejected. |
| radio wedged | red | Reachable, but the wireless driver stopped responding. |
The detail line under the badge expands on the state:
- Connected:
Connected to <SSID> - <ip> - <N> requests, the live request count climbs as traffic runs. - Idle but reachable: the adapter names (monospace) and the member version, for example
- v1.0.0. - Unreachable: the reason in red.
- Radio wedged: "Radio stopped responding (driver wedge). Power-cycle or replug the adapter." This is a hardware reset, not a software error, see Troubleshooting.
Two more lines may appear:
- Limits - the member's capability limits drawn from its chipset, for example "No WPA3-SAE (legacy chipset); No 5 GHz frame injection; Max channel width 40 MHz (no 80/160 MHz)". Read these before you deploy; a member with these limits cannot host or join a WPA3 network or inject on 5 GHz.
- In use by another pack leader - shown when a member is connected to a network that is not one you assigned, meaning another leader is driving it.
- When idle, the member's last error is surfaced in red so you can see why a previous deploy failed.
The management view stays up even when a radio wedges, so you always see the real state of every member.
Step 4: Deploy a network to a member
This is the core action: push one of the leader's networks to a member and start its traffic. Each member's card has a deploy row with three selectors and two action buttons.
The three selectors, left to right
- Select network... - which of the leader's networks to push to this member. The list is every network you have defined (see Networks). This is required; deploying with it blank shows "Pick a network to deploy to".
- Traffic profile - the bundle of traffic generators to run (defaults to Standard traffic). See Step 5 for what each profile does.
- Traffic dataset - where the traffic goes. Leave it on Default targets for the built-in safe target pool, or pick a saved dataset (Step 7). See Traffic Console for the same target lists used per box.
The two buttons
- Deploy - pushes the network's client config to the member, waits in the background for the member to associate, then starts the chosen profile's traffic (and reconnect cycling if the profile includes it). You get a "Deploying
<name>to<SSID>" toast and the member card updates to connected once it associates. - Stop - disconnects the member, stops its traffic, and clears the assignment. The member returns to idle.
Both buttons disable while that member is busy with a deploy or stop.
SCREENSHOT NEEDED: The open traffic profile selector on a member's deploy row showing the three options Standard traffic, Full traffic, and Handshake capture.
Step 5: Choose the right traffic profile
The profile bundles which traffic generators run on the member, and whether the member cycles its connection. Pick the lightest profile that produces what you need; heavier profiles are just more noise if nothing is listening for it.
- Standard traffic - web, DNS, and ping over both local and internet targets. No downloads, no credential logins, no responder bait, no reconnect cycling. Pick this for most labs: it keeps a network alive and feeds a capture without extra noise.
- Full traffic - every generator, including downloads, credential logins, and domain (responder) bait, over local and internet. Pick this only when something is listening for that extra traffic, a packet capture for the cleartext logins or a poisoning listener for the bait. Otherwise Standard does the same job with less noise.
- Handshake capture - the Standard traffic generators plus reconnect cycling (it does not add downloads or credential logins). The member drops and re-associates on a schedule (about every 2 minutes, with up to 15 seconds of jitter), so it produces a fresh WPA handshake each cycle. Pick this paired with a packet capture to mass-produce WPA handshakes.
The selected traffic dataset then sets the actual URL, domain, and IP target lists the web, DNS, and ping generators use. A member left on Default targets uses the built-in safe pool.
Step 6: Let members pass captive portals automatically
If the network you deploy has a captive portal, the member passes it automatically, with no per-member setup. You do not type a credential anywhere on the Pack page.
When the deploy network has a portal, the leader draws a valid credential from the network's assigned credential set (one is auto-generated if you did not assign one) and pushes it with the connection config. The member fills the real portal form, a hotel room plus last name, a voucher code, an AD login, whatever the portal's auth type calls for, so the portal grants access and harvests a believable login. The harvested login is tagged pack member in Captured Data so you can tell members apart from real walk-up clients.
To set this up, assign a credential set to the network on the Networks page before you deploy; see Captive Portals and Captive Portals for the portal and harvest side.
Step 7: Build reusable traffic datasets
The Traffic Datasets panel at the bottom of the page manages the reusable target lists members browse, resolve, and ping, the same datasets the Traffic Console uses. You pick one per member in the deploy row above.
SCREENSHOT NEEDED: The Traffic Datasets panel showing the table of datasets (Name, Targets summary, Type badge, Edit/Del actions) and the New dataset form with Name, Description, and the URLs to browse / Domains to resolve / IPs to ping textareas.
The panel header shows the dataset count. Below the intro line, the table lists each dataset:
- Name (with its description under the name, if any).
- Targets - a summary, for example
12 URLs - 8 domains - 4 IPs. - Type - a badge, builtin (info color) for the shipped sets or custom (neutral) for yours.
- Row actions: Edit loads the dataset into the form below, Del deletes it (with a "Delete dataset ...?" confirm).
Create or edit a dataset
The form heading reads New dataset normally, or Edit dataset when you are editing one:
- Name - required, for example "Marketing team". Saving with an empty name shows "Dataset name is required".
- Description - optional, a short note on what the profile simulates.
- URLs to browse - one URL per line; the web generator visits these.
- Domains to resolve - one domain per line; the DNS generator resolves these.
- IPs to ping - one IP per line; the ping generator pings these.
Click Add dataset to create a new custom dataset, or Update dataset when editing (the button reads Saving... while it works, and Cancel appears next to it in edit mode to discard your changes). A successful save shows "Dataset saved".
Judgment: leave members on Default targets for generic, safe-pool traffic. Build a custom dataset when you want traffic aimed at hosts, intranet pages, or domains you control, for example to make traffic look like a specific department, or to drive DNS/ping at a listener you are running. The built-in sets cover the common cases (connectivity checks, general browsing, local intranet, DNS chatter).
Step 8: Run a believable room of clients
With members registered and datasets ready, you drive the whole room from this one page.
- Register two or more members (Steps 1-2).
- On each member's deploy row, pick the same network, choose Standard traffic, and leave Default targets (Steps 4-5).
- Click Deploy on each. The cards flip to connected as members associate, and the request counts start climbing.
- Watch the live status: requests per member, the SSID and IP each landed on, and any limits or errors, all updating every few seconds.
If the network has a captive portal, the members pass it on their own (Step 6) and the logins land in Captured Data tagged pack member. Pair the network with a packet capture and the members keep it fed; switch a member to Handshake capture and it mass-produces WPA handshakes.
Teardown propagation: if you stop or delete a network on the leader, every member assigned to it is automatically disconnected and unassigned. Members never chase a network that has gone away, so you can tear down from Networks without touching the Pack page.
Step 9: Keep the pack on matching versions
The Update all members button (top right) pushes the latest release to the whole pack. It is disabled when there are no members, and reads Updating... while it works.
Clicking it asks to confirm: "Push the latest update to all pack members? Each downloads, applies, and restarts." On confirm, the leader downloads each needed CPU architecture's verified binary once and pushes the matching build to each member over the agent channel, so a member never needs its own internet access. A member that does not report its architecture, or lacks the push endpoint, falls back to pulling the release itself.
When it finishes you get a "Update sent to N/M members" toast, and any member that failed shows its own error toast with the reason. See Updating for the full update mechanics, and Settings for the leader/member role and agent key.
Per-member housekeeping
- Stop (deploy row) - disconnect and stop a member's traffic, clearing its assignment, without removing it from the pack.
- Del (top right of the card) - remove a member from the pack entirely, after a "Remove
<name>from the pack?" confirm. This only forgets the member on the leader; it does not touch the member box.
Common pitfalls
- unreachable badge - check the address (right host, right port), that the member box is up, and that the agent key matches. A regenerated key on the member makes the old leader entry unreachable until you re-add it.
- no adapter badge - the member reports zero wireless adapters; check its USB adapter and Settings -> radio on the member.
- radio wedged badge - a hardware reset is needed (power-cycle or replug the adapter on the member). See Troubleshooting.
- Deploy does nothing - you left Select network... blank; pick a network first.
- A member shows "In use by another pack leader" - it is connected to a network you did not assign; another leader is driving it. Stop it from that leader first.
Related pages
- Client Mode - what a member looks like locally, the per-box client view
- Settings - the Pack Agent Key and the leader/member role on each box
- Networks - the networks you deploy to members
- Traffic Console - the per-box version of the same traffic engine and datasets
- Captive Portals - where member portal logins land, tagged pack member
- Updating - how in-app and pack-wide updates work
- Troubleshooting - radio wedge and adapter recovery